During product development, it was particularly important to us that our low-carb and gluten-free bread mixes are easy to prepare and absolutely sure to turn out well.
Most of our customers are absolutely pleased with the baking result first time, even those who do not have experience in baking whatsoever. From time to time, however, there are customers whose results may be less favourable due to various mistakes made during preparation. In case you are one of them, here you will find the solution – for sure.
All about baking bread with Dr. Almond Baking Mixes
1. Mistakes during preparation
Weighing / Measuring
Weighing / Measuring
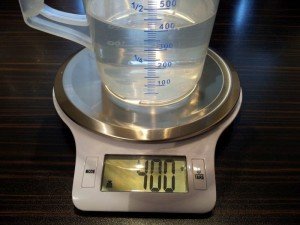
The water quantity stated on the package should ideally be weighed with a digital scale. Unfortunately, many measuring cups measure rather inaccurately and can’t be read off that easily so that you may easily measure too much or too little water. 400 ml water correspond exactly to 400 g water.
If you use too much water, the dough turns out a bit softer, rises better, but chances are that it will collapse more easily after baking. Depending on how much the ‘too much’ really was, the result may still be quite good and the bread is just a little bit fluffier. But if the quantity of water had been quite large, you may very well end up with a completely failed loaf of bread.
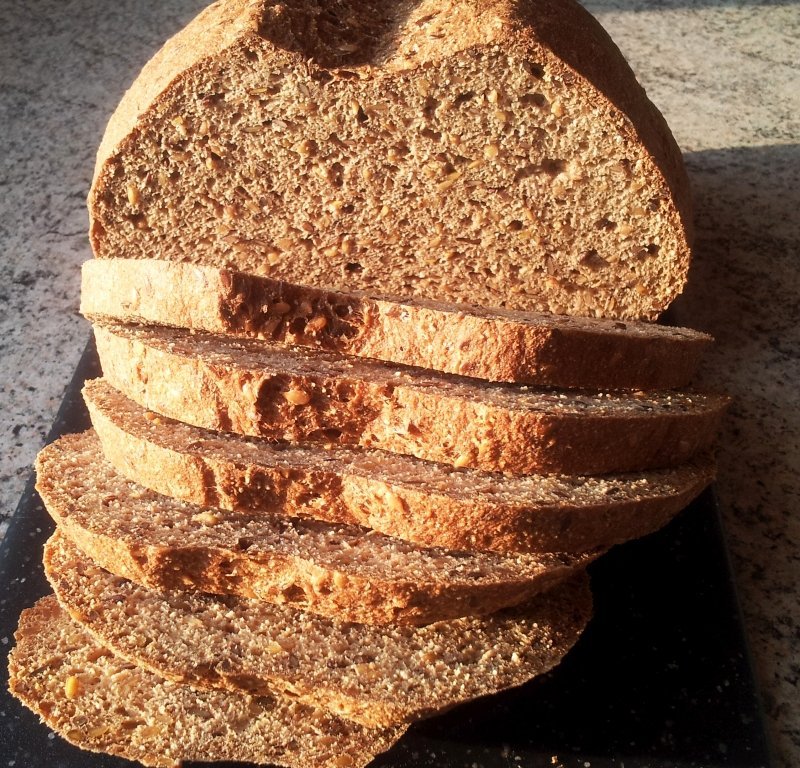
When using too little water, the dough turns out firmer and rises less, what you get is a compact, dense loaf of bread with a fine-pored crumb.
Depending on your personal preference, you can use this fact for your own advantage. For buns for instance, we even recommend to use a little bit more water, as buns proportionally have a thicker crust which can better stabilise a softer crumb inside. They’ll turn out fluffier when using more water. If you wish to get a more compact bread or bun, you can easily manage that by using less water.
Mixing and shaping
These two items are directly linked together. The flours we use in our baking mixes are very rich in fibre, which thicken pretty quickly when adding water. You’ll notice that immediately when the baking mix ends up in water: at first, the dough can be whisked as easily as a soft cake dough, but already after 20 seconds, the dough starts to get thicker and firmer until it can only be kneaded by hand. And precisely at this moment you may run into an error that creates more or less large air pockets in the bread loaf afterwards: the dough has been mixed too long. When we speak of “mixing too long”, there are two ways of doing this, one of it is harmless and can easily be fixed, however, the other is not.
Let’s start with the harmless one. If you mix the dough between 2 and 5 minutes (depending on your kitchen appliance), the dough gets so thick that it cannot be formed that easily. As soon as you’ve managed to form a loaf, it may very well be that it has a picture-perfect finish, however, you have left lots of air pockets inside. But this problem can be easily tackled with a little bit of muscle power, just keep ‚beating up’ the loaf. Simply wet your hands, take the loaf in one hand and punch it down with the other hand – it’s best to do this from all sides.
When it comes to the less harmless way of ‚mixing too long’, you’ve probably mixed the dough for more than 10 minutes, most probably with a food processor. This happens in particular to such customers who have baked their own wheat bread before and still remember that bread dough should be kneaded for an extra long time in order to achieve best results. Well, you’ve gotta get over that: this may well be true of wheat doughs – long kneading causes the gluten strands to get longer and stronger. With our breads, it’s exactly the other way round: here, you would ruin the protein network! The unbaked loaf may look wonderful, but hasn’t enough stability during rising to form a firm crumb and lots of air pockets show up. In the worst case, the loaf can even collapse completely.
Therefore: only stir the baking mix into water for as long as it takes to make the powder disappear. Then form in shape with wet hands, punch down again, and then place the loaf in the oven.
Have a look at this how-to video and see how easy it can be (German):

By loading the video, you agree to YouTube's privacy policy.
Learn more
Wet hands – are absolutely mandatory here!
Anyone who has ever touched a dough with dry hands will quickly notice why we recommend kneading it with wet hands: because only with wet hands can you shape the dough perfectly, otherwise it will only stick like hell. The best thing is to place a bowl with water next to you and dip in your hands over and over again. As soon as the loaf or bun is pre-shaped, you can properly even the surface with water. You don’t need to worry about wetting the dough too much as the water will immediately evaporate on the surface. The only thing you should avoid, though, is to over-wet the dough at first and then knead it through all in a tumble.
2. Mistakes during baking
Special requirements when using baking dishes
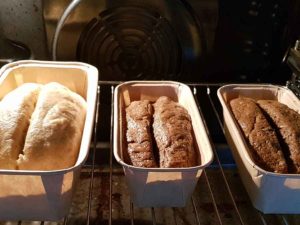
In general, our breads can be baked in the oven either unmoulded (= without loaf pan, just placed onto a baking sheet with baking paper) or in a loaf pan. However, the result with a loaf pan is often not so good as free-form breads, therefore we recommend not to use a loaf pan, especially if you’re a novice baker.
The reason for this: Our bread doughs contain a large quantity of water due to their fibre content, of which a certain part of it is intended to evaporate during baking. When placed into a loaf pan, the water can only escape upwards as the sides of the loaf are enclosed by the pan. And that is also one of the reasons why our breads are NOT suitable for bread machines – these things are simply too airtight and the water cannot escape! (hot-air fryers, however, are wonderfully suited for this purpose, they blow the water out ‘like a champion’ …)
Specifically designed for our breads, you’ll also find loaf pans with a grid of holes or paper baking moulds where this risk does not exist. Furthermore, some of our breads, such as the toast bread and the almond brioche, contain less water so that these types of bread can also be baked in a closed mould without any problems (e.g. in this silicone mould).
Those who have already gained some experience in bread baking and especially those you know their oven very well can easily get good results with almost any loaf pan and with any baking mix. You’ll simply need to adjust the baking time and oven temperature accordingly and consider some points. This goes in particular when using closed moulds:
• You should definitely make either a wide cut along the length of the loaf or score several wide cross-sections. We recommend to do so for any type of bread anyway (also for heart-baked bread), but here it is particularly important.
• The loaf pan should not be too narrow: wider and flatter moulds are better.
• Never bake more than one type of baking mix all at once.
• The oven temperature should be at least 15 degrees higher than baking free-form bread.
• Baking times might be slightly longer.
Perhaps it sounds as if we contradicted ourselves as we in general categorically advise against the use of closed baking moulds. This is just because we simply can’t always and everwhere explain in detail the many particularities you should take into consideration when baking bread in a closed mould. To be certain that all our customers are happy with their baking results from the very beginning, the hit rate with recommending “Please do not bake in a closed mould” is simply much higher than just starting with “Well, theoretically this would also work, BUT…”. If you have read this far, you’ll know what we mean.
Oven temperature, convection oven and baking time: a classic case of “it depends”
One of the most common problems is in fact caused by the oven – because: EACH OVEN IS DIFFERENT!
Even though we state a certain temperature range on the package, of course it is no guarantee that precisely this setting delivers the perfect result with your oven. Some ovens display a certain temperature but in fact heat to a much higher or lower temperature. Some ovens come with a very powerful convection fan and others show only poor performance or have no convection at all. To understand how important the three parameters temperature, convection and baking time are, we want to explain in detail how we bake our breads (and compare this with the baking process of grain bread).
When baking grain bread, you’ll experience a starch agglutination and a coagulation of protein during the baking process. During starch agglutination, the gluten releases parts of its bound liquid to the starch, which gelatinises at approx. 60 – 70° C, whereas the gluten coagulates. This process ensures a firm and stable crust of grain breads after having reached the desired volume. The water content in grain bread doughs is in general relatively low (compared to our breads), so that the bowl of water in the oven or adding steam (as pro bakers would do) will lead to better results as this makes it easier for the starch to gelatinise. This does not apply to our breads as they contain neither starch nor gluten and the process described above simply does not happen and, in addition, the water content of the dough is per se much higher.
Dr. Almond breads must undergo 3 process steps during baking:
- rising (gaining volume)
- protein coagulation
- losing water (= losing weight = firm crust)
In the first step, the raising agent (baking powder) ensures that the dough increases in volume, the bread ‘rises’. This is also the case with grain bread, but the raising agent is usually yeast. Using yeast as a raising agent ist not possible with our breads as yeast needs carbohydrates as fuel. Both with baking powder and with yeast, carbon dioxide is released under heat, which (together with water vapour) triggers the so-called ‘oven rise’. The internal pressure of the loaf increases and ‘bloats up’ the bread.
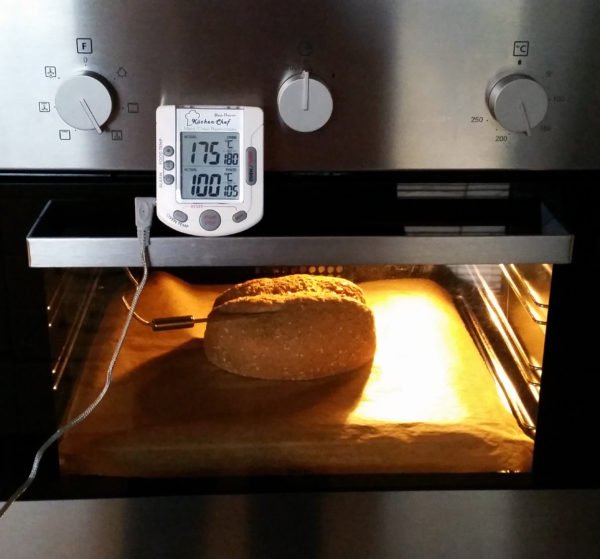
So during the first 20 – 30 minutes of the overall baking time you can watch the bread shooting up in height while the internal temperature of the loaf is rising continuously. In the meantime, the different proteins in the ingredients start to coagulate. With an oven temperature of 180° C and a 500 – 600 gram loaf of bread, an internal temperature of almost 100° C has been reached after approx. 35 – 40 minutes.
At that time, all proteins have been coagulated and theoretically, the bread would be already ’done’. But if you take the bread out of the oven now, it would collapse at once – what a miserable result! For this reason, you’ll find a strict notice on each package of our baking mixes to keep the oven door CLOSED throughout the whole baking process. But why?
Quite simple: the protein network in our breads cannot be compared to the gluten network of proteins or starch in grain bread – it simply is weaker. To make sure the crust is firm enough, the bread MUST continue to lose weight and this happens to a significant extent only from an internal temperature of approx. 100° C, because only then water evaporates on a major scale.
In addition, from this moment on, the crust is getting firmer and thicker, which also helps to stabilise the crumb. That is why smaller pastries such as buns require a slightly shorter baking time: they reach their maximum internal temperature faster and proportionately have more crust, which also gets crispy even faster.
In plain language this means: we have to wait for the right moment when the bread has lost so much weight that crumb and crust can properly stabilise the bread dough. As long as this is not the case, the internal perssure of the loaf does the job – with water vapour and carbon dioxide. If you open the oven prematurely, the pressure would drop in an instance and the bread would fall flat.
Against this background it is easy to see why water loss (’drying’) during the baking process of our breads is of vital importance and why the ability of the oven to cook out water from your bread is so important. Again: this is why bread machines are unsuitable for this purpose (they are closed all around) and hot-air fryers as an alternative ‘oven’ are great (they blow the water out like crazy).
Why is it better to use convection?
The drying process is boosted by a powerful convection as the water vapour is much quicker blown away from the loaf. Insanely enough, the water vapour has a cooling effect on the loaf surface due to evaporation as it has a lower temperature than the oven itself. The faster the vapour disappears, the quicker remaining vapour can escape from the bread loaf. For more details on the subject ‘baking temperatures’ please read this article (in German).There, you’ll also learn why our breads never get hotter than 100° C and why you won’t have to worry about sensitive nut flours (it’s all physics, dude…).
Why is it counterproductive to put a bowl of water into the oven?
Some customers want to do an especially good job and transfer their home baker knowledge into our breads one-to-one. (We are always very sorry having to convince them that this is exactly the wrong way to do it.) When baking grain bread, we all know that a bowl of water placed in the oven is a great idea. Some people even have a high-tech oven with bread baking function plus the option of adding steam. However, both features are completely counterproductive when baking one of our breads. The water should be kept OUT and not IN and therefore, adding more water from outside is no good idea.
At this point, this also explains again why closed and airtight baking moulds might be problematic – water loss is being hampered in those moulds. As mentioned before, increasing the baking temperature and using powerful convection is often the best bet and it’s perfectly possible to achieve pretty results, provided some points are observed (see above). (For beginners: please do NOT try out on the first go!)
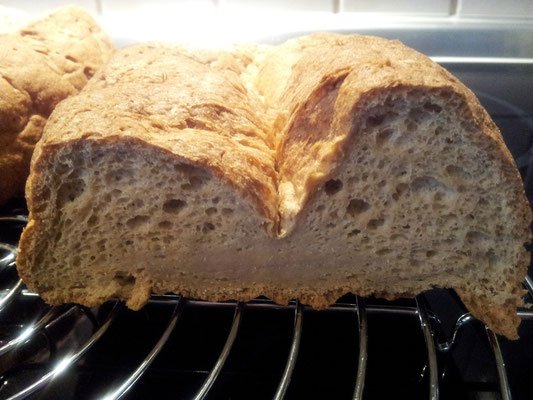
If the bread dough doesn’t rise OR collapses during the first half of baking
We’ve already learned that too less water may have the result that your bread doesn’t rise properly. And also your oven may be to blame for that.
 As already explained, the baking powder is activated by heat and ensures that the loaf puffs up by releasing carbon dioxide. If your oven does not provide the temperature needed to properly kick off the so-called oven rise and keep this process going over a sufficient period of time, the bread won’t rise as well as it should. Here, it usually helps to set the temperature significantly higher from the very beginning. Should the bread turn out a bit too dark, use the lower baking tray (I don’t mean the dripping pan right down at the bottom but the shelf directly above, the heat circulation downwards is also of importance here.)
Right at the beginning of the baking process, the bread loaf is still highly sensitive. If your oven fails to keep the temperature constant (e.g. if its temperature fluctuates substantially), this may either prevent the dough from rising at all or cause an already risen loaf to collapse. Unfortunately, we don’t know exactly how to handle fluctuations in temperature – this indicates a malfunction of the oven and this means for you either call the customer service or buy a new one. You don’t need a super expensive model to make a perfect Dr. Almond bread – we used a run-of-the-mill oven from the big shop with blue letters on yellow background for € 199 during product development – and it has worked out perfectly. The main thing is that it comes with convection function, and this is the case with almost any oven type anyway.
3. Mistakes at the end of baking time / after baking
Turn off oven, take out bread? Definitely!
Another mistake we’ve come across from time to time is ’let cool in the oven’. This is common practice when making cheese cake, where it certainly makes sense. With our breads, however, this is less helpful. Either the bread has already lost enough water in the oven to stabilise its crumb – or not, and then you need to let it bake a little longer. Because as soon as the heat inside the oven is decreasing, the internal pressure of the bread drops as well. It would also drop if you’d just turned off the oven leaving the bread inside, as the water vapour would cool the loaf from outside. If the permanent heat source (the hot oven) breaks away, the temperature drops and so does the pressure.
The internal pressure of the bread ensures that the bread loaf retains its volume, ALTHOUGH the crumb has not yet fully stabilised.
If you turn off the oven before full stabilisation, it is of little use to leave the bread in the oven – it would collapse anyway.
But if it had been just cooked to perfection, it makes just as little sense to leave the bread in the switched-off oven any longer.
 When the oven is switched on, there’s a slight excess pressure due to the water vapour inside, which can escape through slots (depending on the oven type at different areas). When the oven is switched off, the excess pressure reduces and the water vapour shows less motivation to escape through the oven. Instead, it moves across your ready baked bread and causes, at worst, that the water content in the bread increases again slightly. Not to such an extent that it might collapse again, but strongly enough to have an adverse effect on the mouthfeel.
So: Wait until the bread has been stabilised sufficiently, then immediately take it out of the oven and allow to cool down on a wire rack. During cooling, the bread even loses a little more water. If you have ever cut hot bread, you will have noticed that the crumb has been still very moist and soft. The mouthfeel is not yet ideal. Only when the loaf has been fully cooled, have you reached the desired and perfect final condition. The bread is juicy but not really soggy. Those who wish can toast it again and crisp it up a bit.
How do I know when to take out my bread?
Unfortunately, this is a really tough one. We recommend a baking time of 70 minutes in a convection oven for most of our breads, and normally 90 minutes when using top and bottom heat. Usually, this workes out pretty well. However, not always. Some ovens only have a very poor convection fan and the drying process is not quick enough. Some ovens are so ’good’ and energy-efficient’ that they hardly release heat to the outside (which is actually a good thing), but also only little water vapour. Here too, the drying process can be impaired. If the result wasn’t satisfactory although you’ve observed the parameters for temperature and time stated on the package, the only thing that is left for you is to find out the perfect settings for YOUR oven by trial and error. But once found, this will work for ANY Dr. Almond bread – for sure.
Below please find some guidance such as how to adjust the device settings of your oven if the following problems come to light:
Bread turns out too dark, but still collapses: increase baking time, reduce temperature
Bread shows a nice color, but collapses: increase both baking and temperature
Bread turns out too dark, but is perfectly shaped: stick to baking time, reduce temperature
Bread’s top browned too rapidly: bake on a lower shelf
Cool properly
It is essential to place the bread on a wire rack for cooling where there is sufficient space downwards. During cooling, the bread is continuously releasing water vapour, and this happens in all directions. If there’s only little space downwards, condensation can form on the rack and may cause a soggy bottom. If you’ve baked your bread in a loaf pan, you should remove the loaf as quickly as you can, because here, too, condensation could build up extremely fast in the mould.
4. More tips and tricks:
Thicker and crispier crust:
To get a pretty firm and crispy crust, simply bake your bread a little bit longer OR re-bake it after cooling.
Bake a little longer:
 When the bread is just ready to be taken out of the oven, you can either maintain the temperature or reduce it a bit. Regarding the stability of the bread crumb, that makes no difference at all, however, the bread could also become a little bit too dark after a longer bake. Once again, it’s all in your oven and, of course, it also depends on how dark and crispy you’d prefer your bread crust anyway. Our breads have still a very high water content in their finished condition, so that it is no problem at all when you extend the baking time considerably. Both crust and crumb get dryer when you leave the bread a little longer.
Re-bake after cooling:
If you’ve cooled down your bread at first and put it in the oven again afterwards, this has the advantage that the crust is already dryer and re-baking is much shorter than just leaving the bread in the oven a little longer during baking. The heat acts directly on the dried crust and makes it even crispier whereas the (cold) crumb is heating up slowly inside the bread loaf and is less sensitive to drying out. So, if you want a juicy bread with crispy crust, this would be the best option.
Baking buns in turbo mode – when time is of the essence:
Sometimes you simply want to get it done quickly. You come home from work, hungry like wolves but the fridge is gaping empty again – in terms of bread. And to make matters worse, you should wait for 70 long minutes + cooling time to enjoy a freshly baked bread?
Here’s a little trick for you how to halve waiting times. You need to preheat the oven to 220° C and shape round flat dough-cakes in palm-sized units from the dough (max. 1 cm thick), cut them into gridlines and put them on baking paper. The baking paper should be put on the grill rack and not on a tray, this way the effect of heat is particularly strong. At a temperature of 220° C, those flat breads need a baking time of just 30 – 35 minutes! After the flat breads have cooled down sufficiently so that you won’t burn your fingers, you can cut them in two halves and throw them just quickly into the toaster (this reduces the moisture content, which is still an issue as you’ve cut them way ‘too quick’). And Bob’s your uncle!
Extra nice breads and buns like freshly done by the baker – OR: long live the bamboo fibre!
If you’ve shaped your bread or bun the way you like it, you can slightly sprinkle your piece of art with bamboo fibre and cut in lines with a sharp knife or stamp it – this way, you can create beautiful baking pieces that can easily compete with any bread from the baker. Bamboo fibre has zero carbs but a texture similar to fine white wheat flour. In addition, it prevents the dough from sticking on the baking paper, which is especially advantageous for buns as the dough pieces can easily stretch upwards during baking just like small balls.
Watch video and be amazed…
By loading the video, you agree to YouTube's privacy policy.
Learn more
5. Summary
Listed below, you’ll find a summary of all points needed to be kept in mind:
- Check the correct water quantity (use a digital scale, just to be sure, as measuring cups may be too inaccurate).
- Stir baking mix with water just until the powder disappears and the dough begins to form.
- Shape a loaf or buns with wet hands and punch down strongly from outside to remove air pockets.
- For beginners: please DO NOT use a loaf pan, instead, you can use baking moulds with holes.
- Place the dough pieces in preheated oven, it’s best to use convection – the bread must be able to dry. If the bread dough is still moist after the stated baking time: extend baking time or increase temperature (or both).
- DO NOT OPEN OVEN DOOR throughout the whole baking process!
- Take the bread straight out of the oven and let cool completely on a wire rack.
6. Finally, let me say a few words
“I’ve followed all the instructions” … this is the most common phrase we hear/read from our customers when they encounter problems during preparation. Depending on their current mood, you may also hear statements such as “This cannot be true, can it? Moreover, the baking mixes are far from cheap”, you get the idea?
First of all – NOBODY would really make a mistake on purpose when baking bread, this is pretty sure. If you KNEW exactly the one thing that you’ve screwed up, you would surely have avoided it, wouldn’t you? Seen from that point of view, we do believe our customers when they BELIEVE they had observed all instructions. This, however, does not change the fact that something must have gone wrong, and this is what leads us to the second statement: “This cannot be true…” – a subtle reproach as if there must be something wrong with our baking mixes.
It’s important to know: We produce ANY of our baking mixes ourselves, this means, we have full control of our raw materials and production processes and monitor EACH batch personally. This means: Our oven is continuously busy with baking test breads from our current production batch and our daily diner options strongly depend on which type of bread we are producing at the moment. We won’t sell any of those baking mixes UNTIL we’ve done this test. But not only our own tests give proof of the high quality of our products, also the thousands of satisfied customers who surprise and delight us day by day with photos of their baked masterpieces. In statistical terms, bread baking works perfectly fine with more than 99.9 % of our customers, and they succeeded at first try!